| E-Billing - Refund Policy Message and Setting |
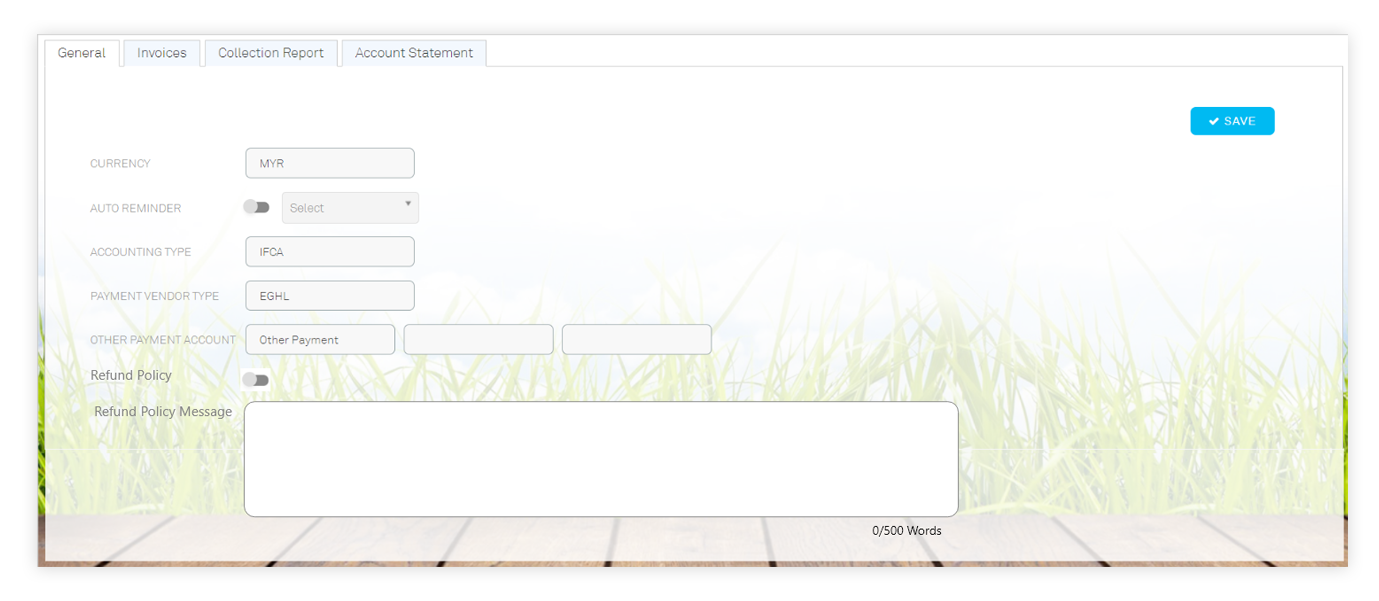
| The E-Billing module is a convenient way for residents to make payment for any pending invoices. In the case where residents had paid more than the intended amount, payment made to the wrong invoice or other valid reasons, Admin will be able to inform residents in regards to the ways or conditions for making a request for a refund. In this latest update, we have added the Refund Policy Setting for Admin to enable and input the message to display for the residents. Once the settings have been saved, the residents will be able to find the Refund Policy button when making a payment and may click to view details about the conditions to get a refund. 1. A sample of the Refund Policy Setting and Message for the Admin. |
 |
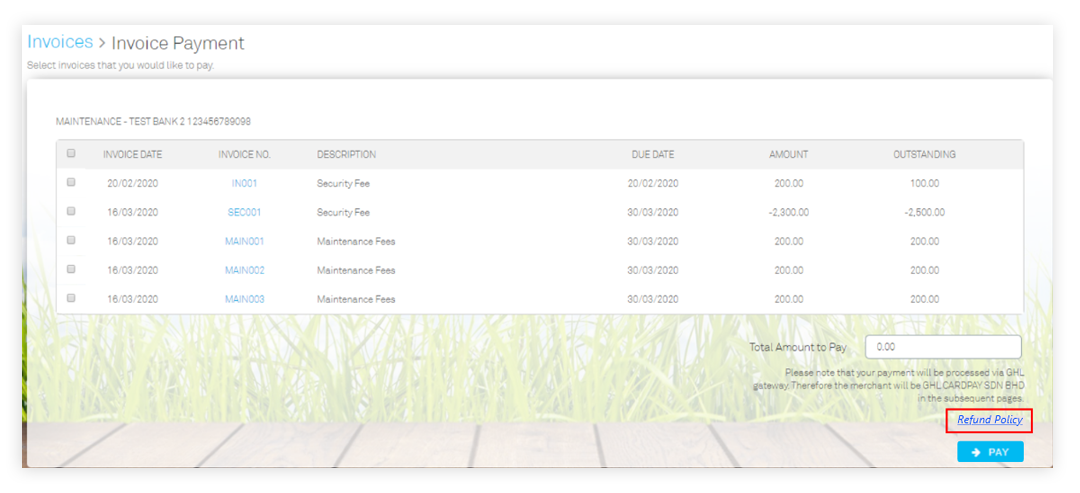
| 2. The residents will be able to find the Refund Policy button during the payment process. |
 |
| Defect Mailer Customisation |
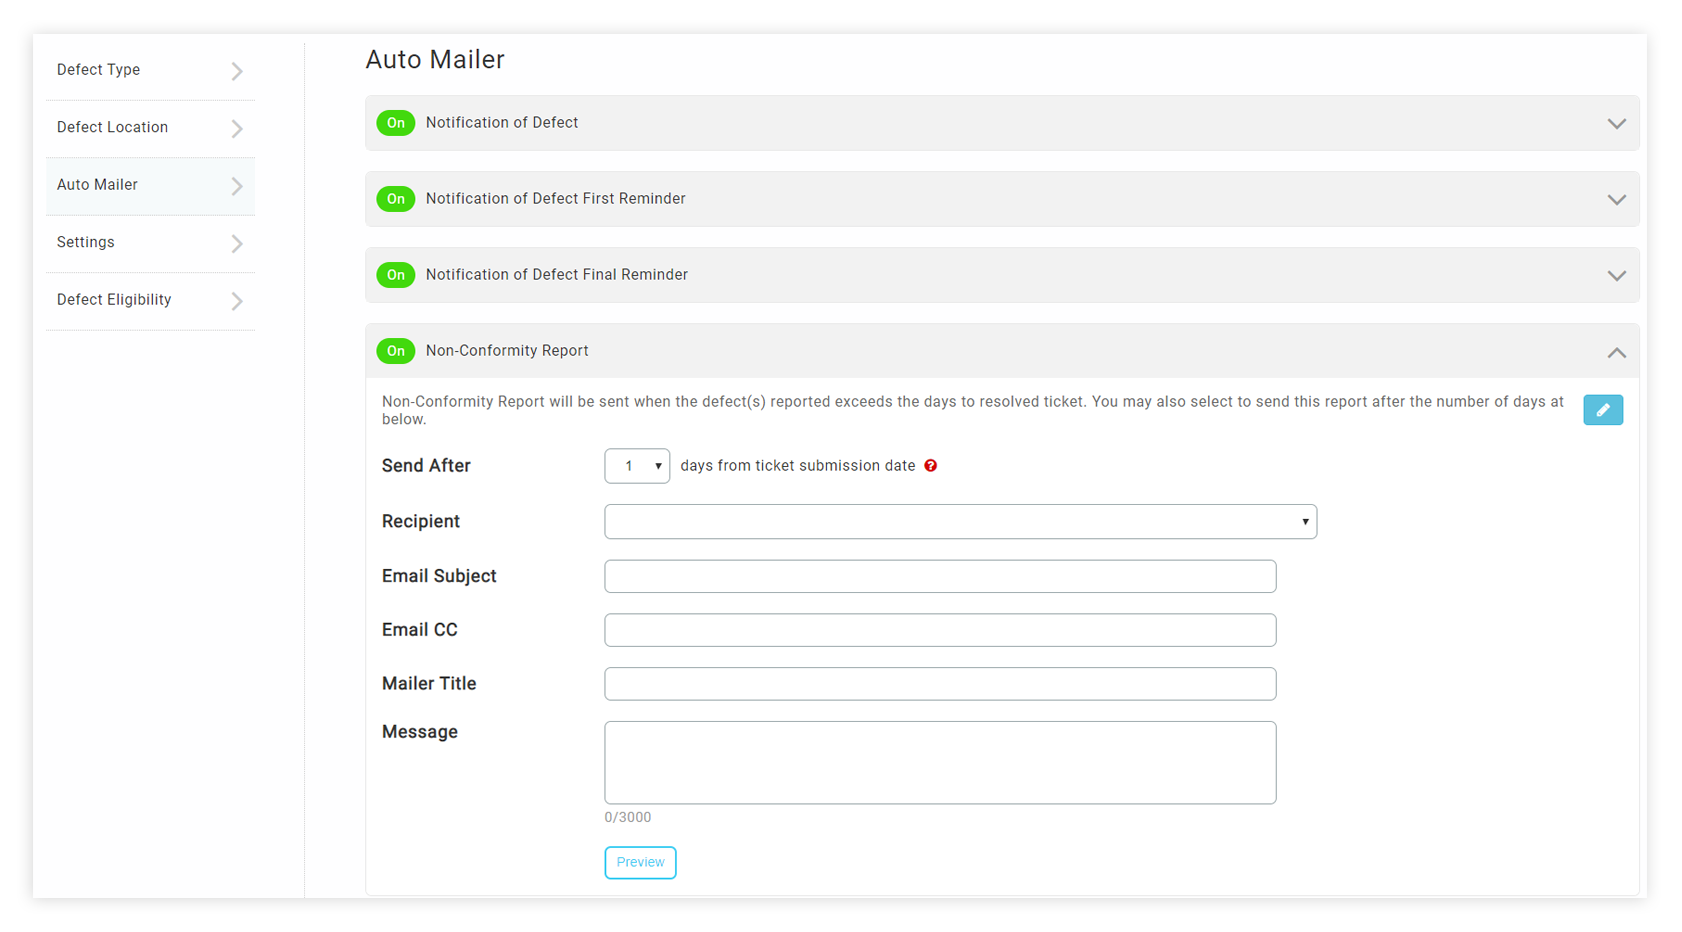
| The defect automailers play a big part in updating and keeping both Admin and house buyers up-to-date. Auto mailers can reduce the hectic process to deliver updates to each and every single house buyer regarding the process of defect rectification. The moment a defect report is being submitted, the house buyer will then receive an acknowledgement of submission at the same time, reminding the Admin that a new defect case has been filed. In this latest enhancement, we have automailers customisation for the defect module. Admins can then choose to enable or disable mailers that are best suited for them. In addition, each mailer will come with its own setting and message box to highlight the important information with the house buyers. 1. A sample of the Auto Mailer listing for the Defect Report Module. |
 |
| i-Neighbour Mobile App Updates |
| E-Billing - Refund Policy Message |
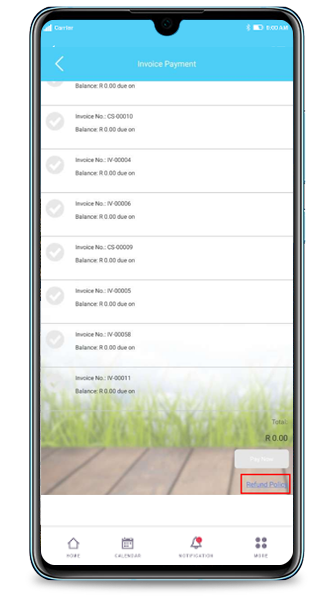
| i-Neighbour Mobile App allows residents to pay any outstanding bill through the E-Billing module via the subscribed payment gateway. Similar to the Web update, once the Admin has enabled and added the Refund Policy message, the residents will be able to find a Refund Policy button to view all messages posted by the Admin. |
| 1. A sample of the Resident Payment Page with Refund Policy button. |
 |
| Home Page - A New Look for Announcement |
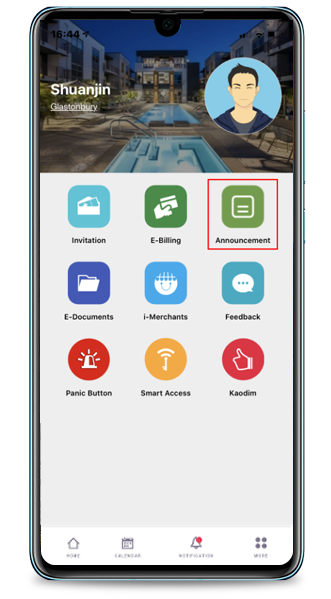
| The announcement feature has always been one of the key features of i-Neighbour. It allows the admin to keep their residents posted on all the important news happening within the community. In this latest update, we have improved the design for the announcement button at the home page. |
| 1. A sample of the newly updated Announcement icon at the account’s Homepage. |
 |
| Integration with Kaodim |
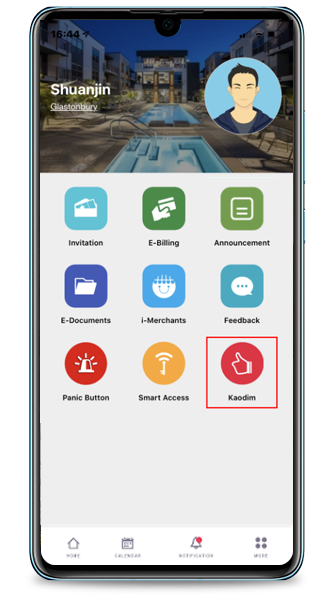
| i-Neighbour has partnered up with Kaodim to provide a wider range of offers to our users within Selangor and Kuala Lumpur, Malaysia. i-Neighbour has integrated Kaodim services that allow users to have easy and fast access to hire the types of services offered by Kaodim. You may now start browsing through the Kaodim services on the i-Neighbour app! |
| 1. We have added Kaodim on the homepage for all residents' accounts. |
 |
| Allow Admin to Add Defect Report for Non-Activated Unit |
| The defect report module within the i-Neighbour app allows users to submit any defect in real-time and also remotely via Smartphone. Users who wish to submit their own defect may activate their i-Neighbour account and submit after signing into the i-Neighbour app. In order to cater to more scenarios, for instance, when an admin prefers to submit defects on behalf of the house buyers, i-Neighbour has a feature that allows the Admin to perform defect reporting for the non-activated units. Therefore, admins or developers can submit the defects for them, if necessary. |
| i-Account New Features |
| 1. Enhancement on Late Payment Interest |
| Late Payment Interest (LPI) function in the system can be used to charge interest on overdue invoices. Recently, we enhanced the LPI settings and billing function as follows: |
| a. Added New Option for “LPI Chargeable” at Item Settings |
| i. Go to Accounting > Items and Inventory > Maintenance > Items > “LPI chargeable”. |
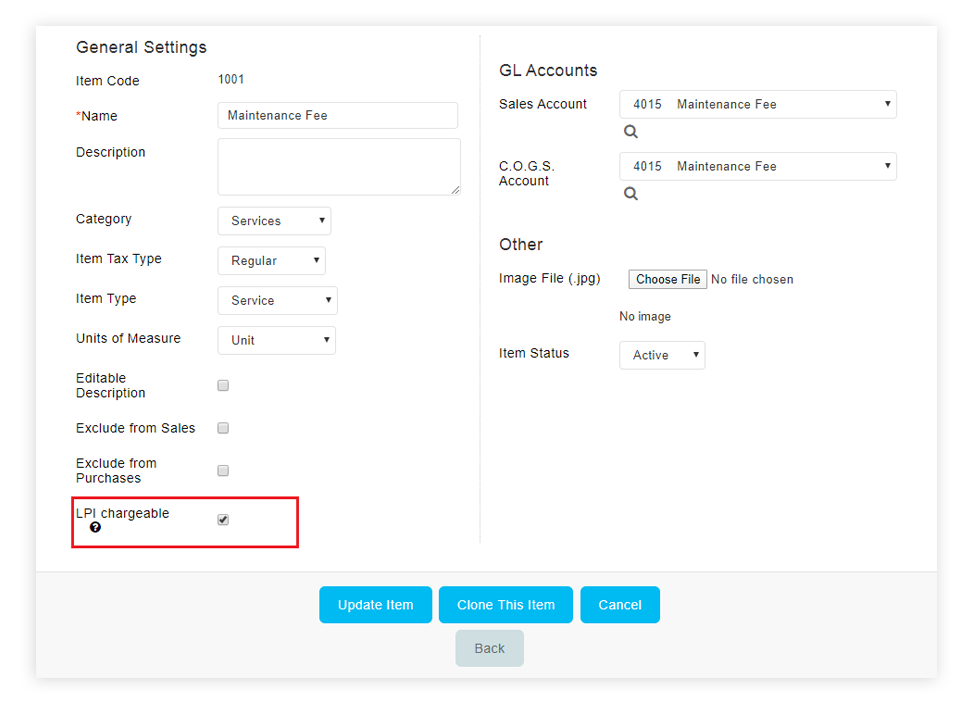 |
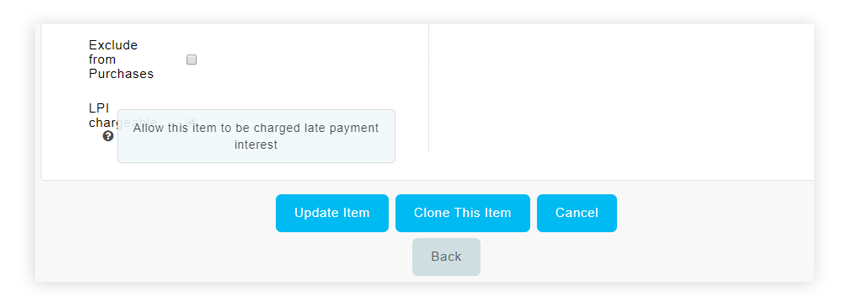
| ii. Tick the “LPI Chargeable” checkbox to enable LPI for this item/charge type. By default, this option is only enabled for Maintenance Fee and Sinking Fund. |
 |
| iii. During invoicing at the Late Payment Interest page, the system will only include overdue invoices for items with “LPI chargeable” option enabled. |
| b. Added Date Range Selection “From” & “To” at Add Interest Advice |
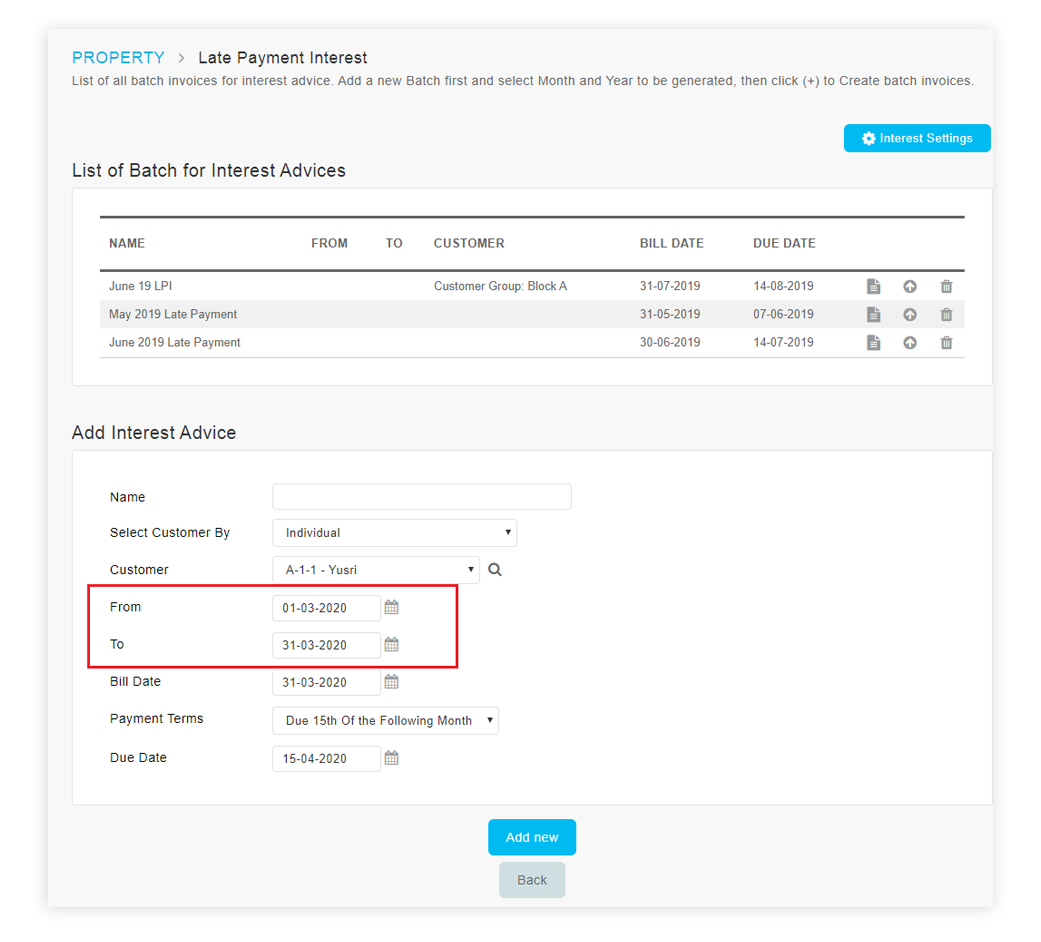
| i. At Late Payment Interest > Add Interest Advice section, we have added a new option to select “From” date and “To” date so that Admins can specify their preferred LPI charge period. |
| ii. Hence, we also removed the previous option for LPI period based on calendar month (e.g. Jan 2020, Feb 2020, Mar 2020). |
| iii. During billing, choose the “From” and “To” dates, for instance 01/03/2020 to 31/03/2020. The calculation of days (e.g. 31 days) will be based on this cut-off period. |
| iv. If an owner has already been charged late payment interest for a date range that falls within the new batch generated, Admin will receive a notification message upon clicking the “+” button (Create late payment batch button). |
 |
| 2. Import & Store Water Meter/Electricity Meter Serial Number |
| Next is an enhancement for both Water & Electricity Meter Setup. Admins are now able to import meter serial numbers (SN) into the system. Once imported, the values will be stored for all future meter readings. More details listed below: |
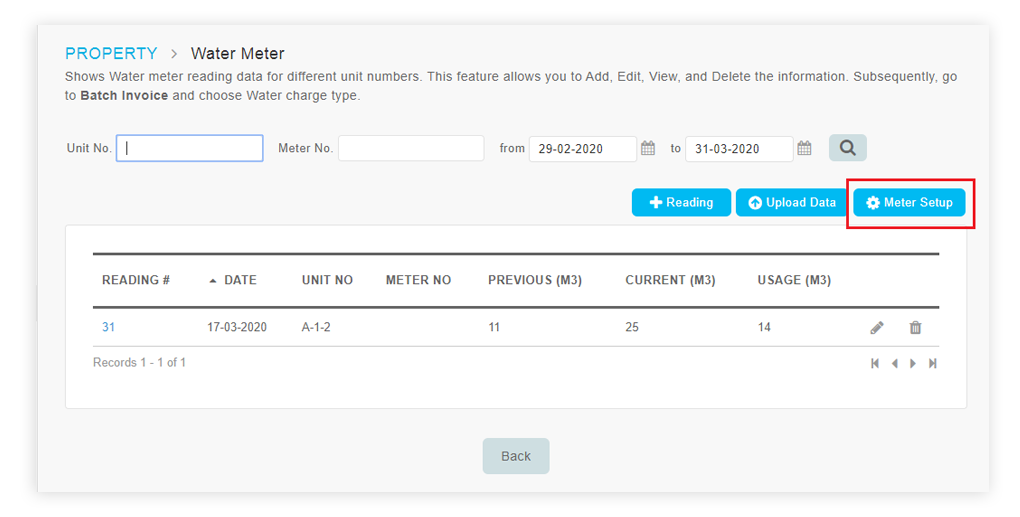
| i. At the Meter Setup page (Water & Electricity), Admin is allowed to import meter serial numbers. |
 |
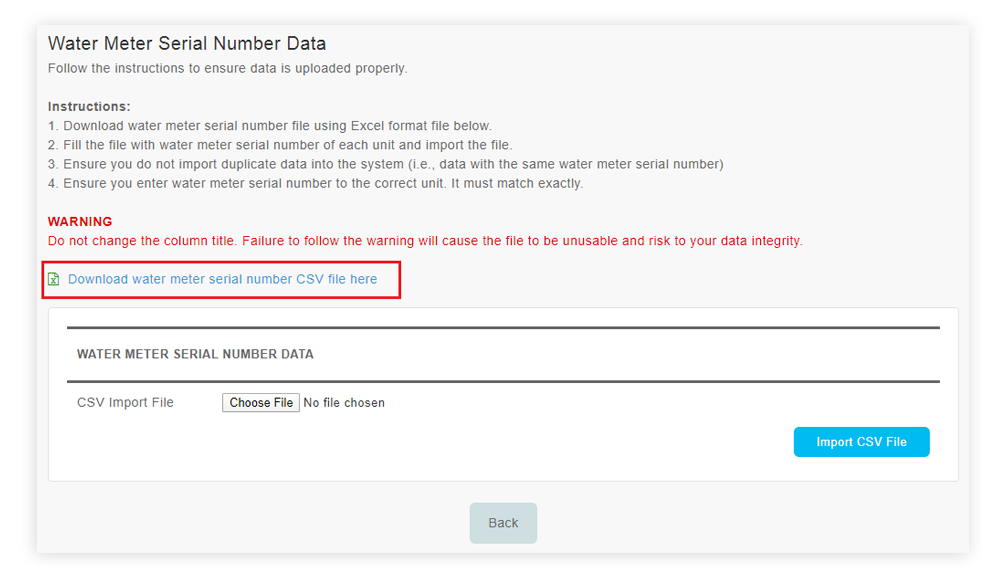
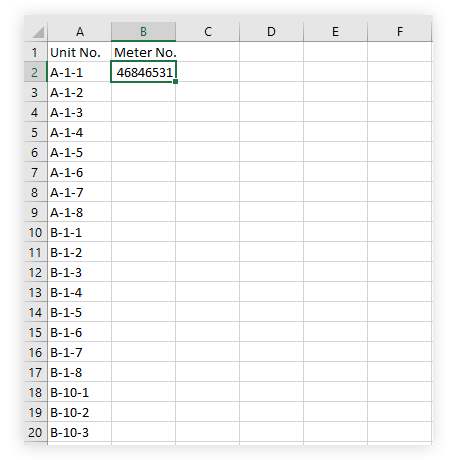
| ii. Download the template (csv file) and input the SN. Next, choose the file and Import. |
 |
 |
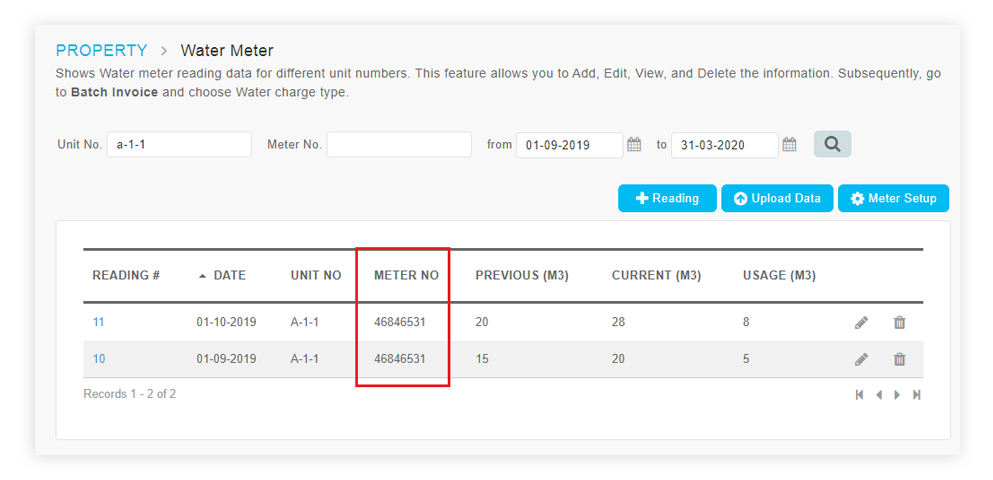 |
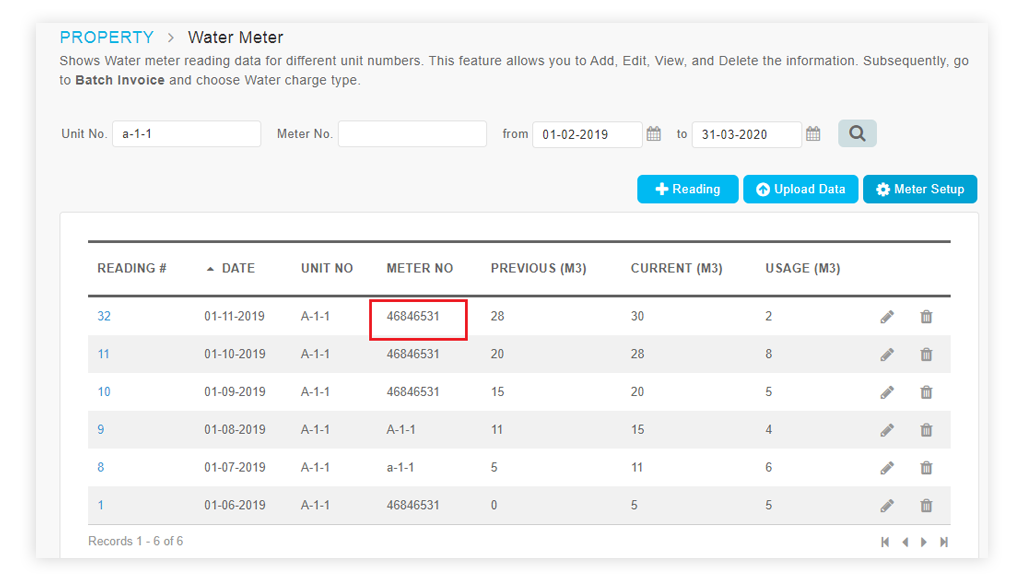
| iii. Subsequently, when Admin uploads Water/ Electricity Meter readings: |
| • If meter SN is not entered into the meter reading csv file, system will retrieve the value from the previously imported meter SN. • If meter SN is entered into the meter reading file, system will take from that value. |
 |
 |
| 3. General Setup – New General Address for Display in Invoice & Other Documents |
| Inside i-Account, the address for each owner is based on data imported from i-Neighbour. The imported address usually comprises: |
| i. High-rise: Unit number, Block Name ii. Landed: Unit number, Street Name |
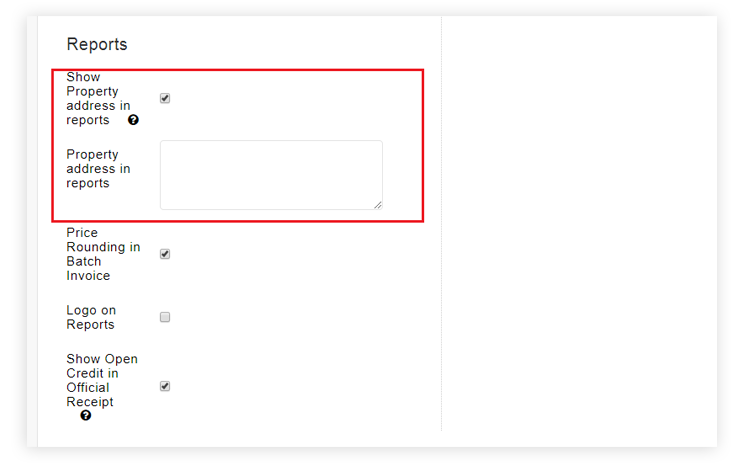
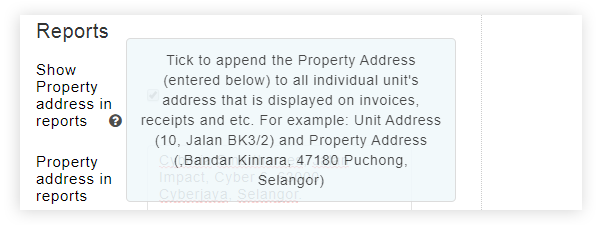
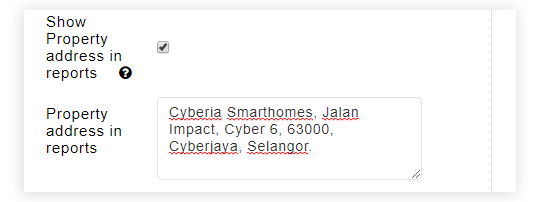
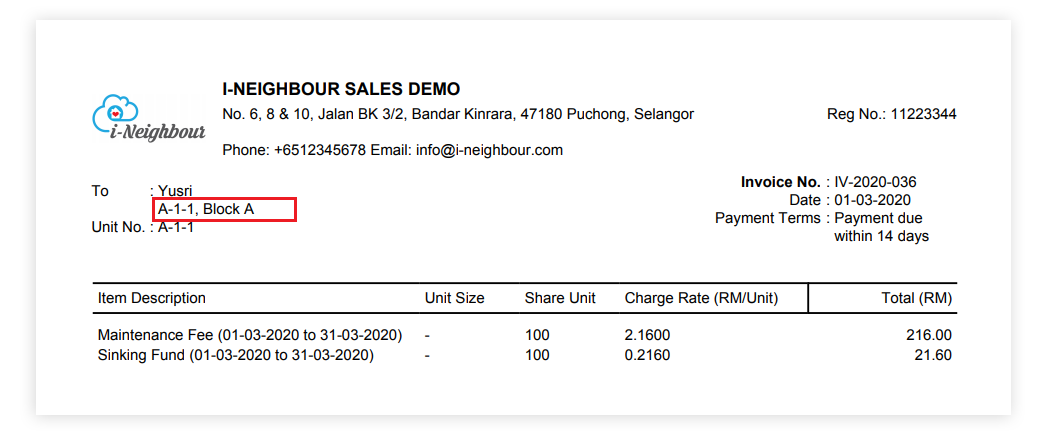
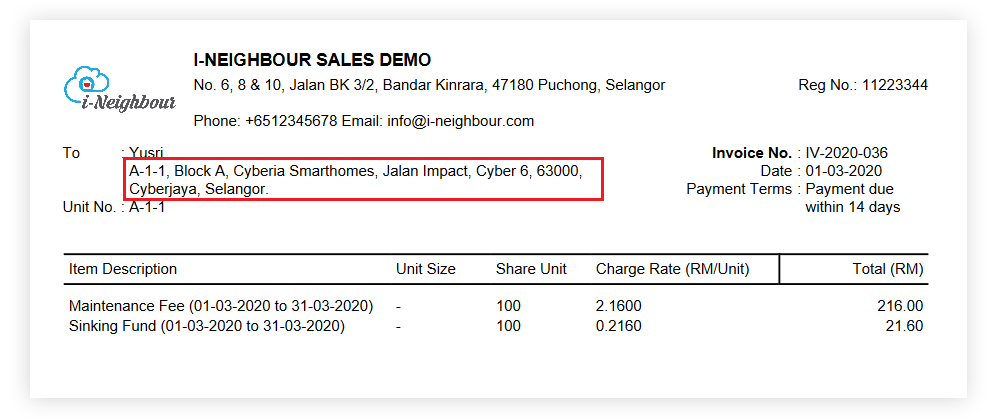
| Therefore, for Management that wishes to provide the full address (i.e. include Region, Postal code, Town/City, State) on Invoices, Receipts and Account Statements, we have added an option to display the Property Address. Go to Setup > General Setup and tick the checkbox ‘Show Property address in reports’ to enable the setting. Next, in the box for ‘Property address in reports’, enter the additional parts required for the address. Please refer to the screenshots below for more information. |
| a. Setup > General Setup > New option: Show Property address in reports |
 |
 |
| b. Property address in reports - Enter the additional parts required for the address |
 |
| c. Sample Invoice (Show Property address in reports – Disabled) |
 |
| d. Sample Invoice (Show Property address in reports – Enabled) |
 |
| 4. Reconcile Bank Account – Added Date Range Filter |
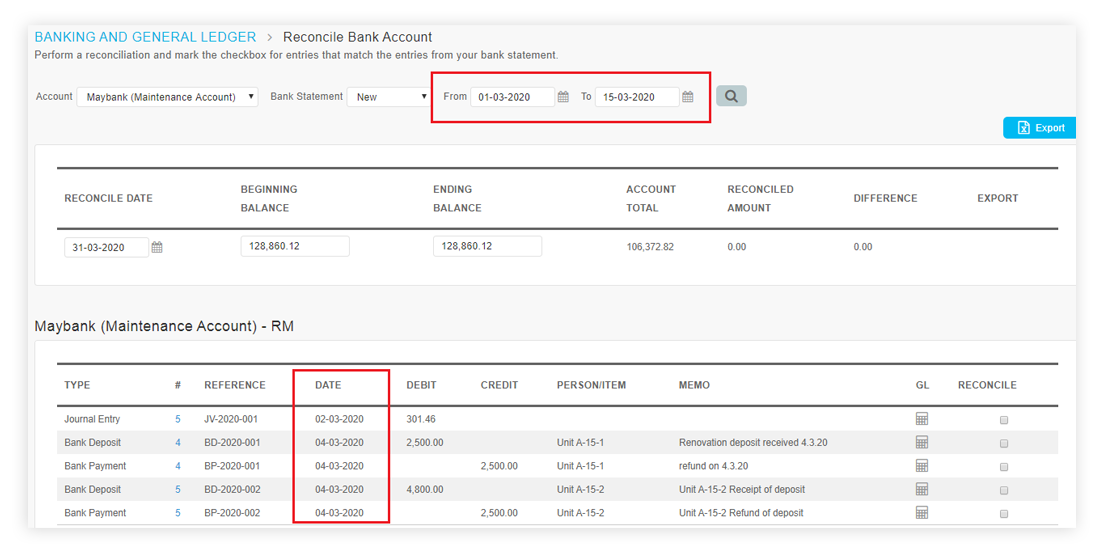
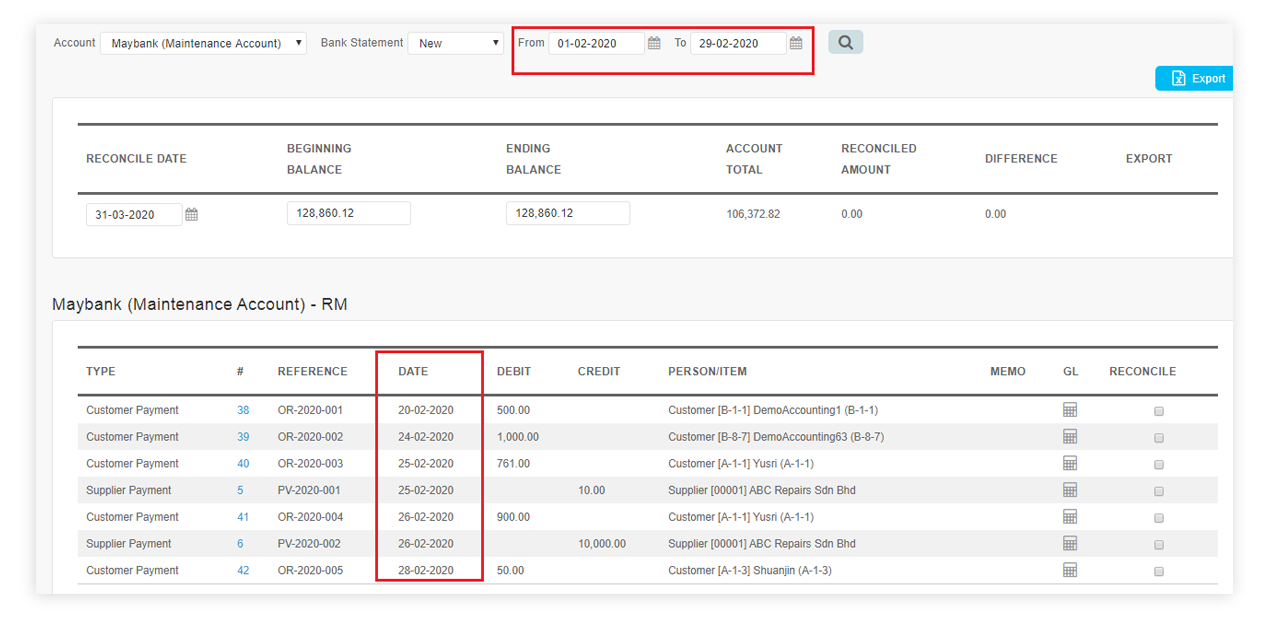
| At the bank reconciliation page (Banking and General Ledger > Transaction > Reconcile Bank Account), we’ve added a date range filter that applies to the bank account transactions table. Therefore, when you are performing reconciliation and searching for entries on a specific date/ date range, you can narrow down with the filter to show only the relevant transactions. |
| a. Added a Date Range Filter (From & To) - Listing Below Follows the Date Range |
 |
 |
| Previous Issue: Feb 2020 |
| Note: If some of the screenshots or steps viewed here are different from the ones in the current system, this is due to our continuous effort to improve our system from time to time. Please notify us at info@i-neighbour.com, we will update it as soon as possible. |
© 2020 Timetec Computing Sdn. Bhd. All rights reserved.
